| Morgana | Gallery | Quotes | Confidant | Party |

This article covers information about Morgana as a party member, including uses and strategies, in Persona 5 and its spinoffs.
Overview[]
Persona 5[]
Morgana first becomes playable on 4/11, soon after the protagonist's awakening, and starts at Level 2. Though he reappears on 4/12, he only officially joins on 4/15. He specializes in Wind skills, healing, downing enemies through Critical hits, as well as preserving and gathering resources not directly related to combat.
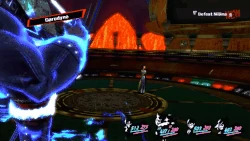
Morgana casting Garudyne.
Morgana is an evasive combatant defined by his mobility, as in spite of his low defense in terms of Endurance and HP cap, it is covered by his high accuracy and evasion in terms of a high Agility stat and a unique armor type which grants him a larger evasion boost than general armor. Morgana's playstyle focuses on accuracy over raw power, as he uses Magic Wind skills with high attack accuracy for moderate damage dealt. However, from a straightforward fashion, though he's efficient in landing attacks, his low damage dealt and having not other related tools at his disposal makes him poor in general combat. Even then, Morgana's still offense-oriented due to his stats as he is more often than not forced to stay on the offensive, resorting to support in emergency situations only.
Salvation is the strongest healing skill in the game.
The power of Morgana's healing is unmatched, as normally he is also able to revive fainted allies with Recarm and Samarecarm, closing in for any room for error. His final skill, learned on Level 75, is Salvation, which can fully heal the entire party and cure any non-special ailments. At first, Morgana can use Me Patra to cure the ailments Dizzy, Forget, Sleep and Hunger at once for the whole party. Rare, but can be a vital tool early on as those ailments leave the party defenseless and also vulnerable to Technical damage.
Due to Morgana's evasion mixed with low defense, Morgana best acts as an emergency healer and a safety net, only having Morgana wield his strongest healing abilities to turn the tables (particularly Salvation & Samarecarm.) As such, Morgana will have room for Wind Boost and Wind Amp, enhancing his general attack power. Especially because of Morgana's reduced defense is why it is recommended to emphasize on offense over precision in support, as not only will the alternative make Morgana fall short in combat, but he'll also be wasting time when switching needlessly to support allies. Though Morgana's offensive and miscellaneous capabilities are weak, he has the freedom to do anything else at any time.
As divided by their armor type, although the male combatants of the group specialize in Physical offense alongside overall combat prowess, while the female members are efficient in Magic and general support towards a technical extent, Morgana's playstyle from his armor emphasizes on survivability and recovery. This further grounds his role as an emergency healer, and it is recommended to have Morgana lean towards vitality over variety as to make the most out of his abilities whenever necessary, especially as a safety measure when other combatants are overwhelmed.

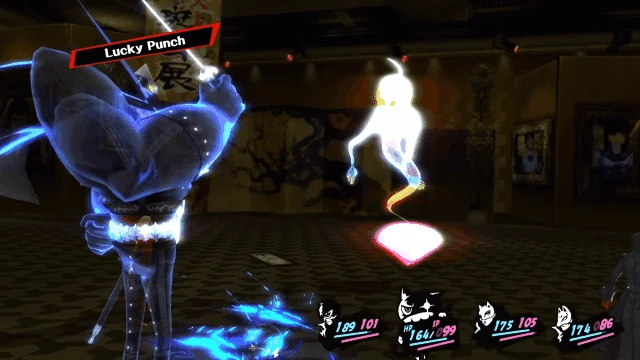
Morgana casting Lucky Punch, landing a Critical on the enemy and instantly initiating Hold Up.
Outside of this routine, Morgana can branch out towards various Luck-based techniques to enhance his own and the party's mobility when it falls short. One of Morgana's abilities is to Down enemies via Lucky Punch, which has reduced power and accuracy compared to a high Critical rate, rewarding the user with One More and the option to pass one's turn to another via Baton Pass; later, Morgana learns Miracle Punch, which has a slightly increased Critical rate as well as increased damage to compare closer to a regular melee attack.
Due to the tactical nature of the game involving exploiting weaknesses, Morgana's Lucky Punch allows not only skipping tough fights (especially against 1 tough opponent,) but it acts as a countermeasure for when the party does not have the tools to exploit an enemy's weakness, or are faced against enemies that simply don't have any weaknesses to begin with. More importantly, it is recommended to use whenever his own abilities simply can't overwhelm the enemy, having the chance to receive 1 More and pass his turn to another via Baton Pass, letting another party member act an additional time, while with increased attack power at that time. Otherwise, Lucky Punch makes it easier to start and elongate Baton Pass chains with the team in general.
Also, Lucky Punch can be used as a straightforward technique especially early on, where Morgana only utilizes the skill's One More ability to follow up with clean Wind damage, as the enemy is already prone to additional damage from any recurring attacks. It is most effective with Miracle Punch and Garula, which yields the damage value of a regular melee attack. The combination of both attacks can severely increase Morgana's damage yield in comparison to a regular, straightforward attack, though not only is it a reckless maneuver, the difference in damage goes down once Morgana learns Garudyne or Wind Boost and Amp skills. This method is useful against multiple enemies, and acts as a quick way for Morgana to single one out.

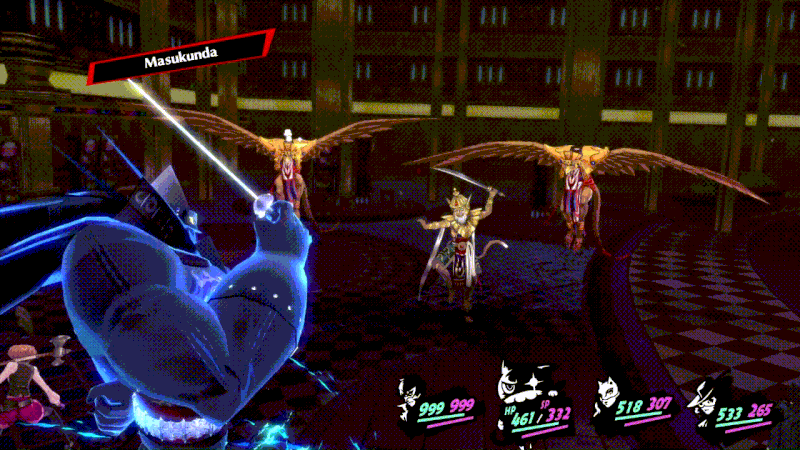
Morgana casting Masukunda on the current enemy team. The difference between buffs and debuffs are that although debuffs allow for flexibility with switching party members, buffs account for additional waves of enemies and reappearing foes.
In addition, Morgana can support the party late in the game with Masukunda, a skill which debuffs enemies' accuracy and evasion for 3 turns, making the whole party more untouchable: for Morgana, it puts a stronger emphasis on party evasion due to his Magic skills already having a higher accuracy by default, but can still minimize bad luck from the party missing their attacks. As Masukunda is a risk-based defensive maneuver, it helps Morgana pick up control over the situation as support, as it also minimizes the risk of multiple allies fainting at once even in overwhelming assaults. This especially applies to revival, as Morgana doesn't have to be overwhelmed with reviving multiple allies at once, as mixed with the evasion boost the period of having to put up with fainted allies is greatly reduced.
Morgana's Masukunda can also be interpreted as an offensive maneuver, as it ensures the party has decent accuracy when it comes to landing hits onto the enemy. It also makes it easier for Morgana to land hits with Lucky Punch in general due to its reduced accuracy, indirectly leaving it with a lower Critical rate than normal.
As an individual party member from a team standpoint, because of Morgana's overall simplified, extreme and precise playstyle, Morgana acts as an anchor when it comes to spreading the party's arrangements when it comes to balancing between offensive, emergency and complementary skills, giving the rest of the party further efficiency through restriction without overwhelming them with choice.
Otherwise, Morgana's abilities are essential to allowing the party to conserve not only SP (as Lucky Punch skips the necessity to exploit enemy weaknesses with elemental skills,) but money and items as well, as Samarecarm skips the need to use up items in one's stock, as well as reduce the need of actually buying supplies, allowing to spend one's money elsewhere. Not only that, but Lucky Punch itself can be used as an exploit to grinding quickly for money via negotiation, especially since Morgana's Confidant ability Pickpocket allows the protagonist to collect items simply by performing a melee attack.
Additionally, his skills are also rather cheap, especially Wind skills, which have a slightly reduced SP cost. Also, because of Morgana's high agility stat, he can very often act first, which also lets him heal and act in emergencies, enemy ambushes included.
Morgana is naturally resistant to Wind skills, and is vulnerable to Electric skills. Morgana's Wind skills are slightly cheaper in SP when compared to other elemental attacks, making it possible to save up in the process. More importantly, his Wind skills are able to inflict Technical damage on enemies that have been burned from Fire skills.
Unlike other Technical combinations, Wind+Burn is not only uncommon, but also specific in nature. That being said, this rarity itself may be exploited wherever appropriate due to enemy resistances that can easily disable many Technical combinations with ease. Otherwise, the combination of Wind and Burn can be exploited by having Morgana co-operate with Ann Takamaki: due to Ann's specialization as a Magic-based combatant who also wields Fire and Morgana's primary role as an emergency healer, they both have the freedom to afflict and exploit respectively, making up for the rarity of this combination. For more information on Ann's playstyle, see Party/Ann Takamaki.
If Morgana's Persona Zorro evolves into Mercurius, he'll be able to learn Evade Elec, tripling the chance of evading Electric attacks. In addition, he now can completely block Wind, and gains resistance to Bless. Unlike other party members, Morgana's Persona is only able to evolve on December 23rd, as his Confidant is automatic, meaning these perks can only be used while exploring the Depths of Mementos and anything after.

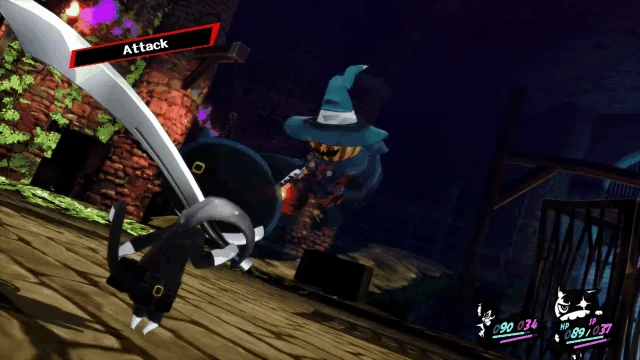
Morgana performing a melee attack.
Morgana's equipment emphasizes on accuracy and evasion over power and defense. On his choice of weapons, though both accuracy-oriented, his ranged weapons are stronger than his melee. That being said, both have the means to give Morgana the chance to either afflict ailments or enhance his Persona via Magic or SP stat boosts. As for his unique armor type, the properties that set it apart from other types of armor is his focus on evasion over defense; the only major difference is that it's designed as a male-equivalent, meaning that in comparison, the female armor is weaker in terms of both defense and evasion.
Morgana's strongest melee weapon is Claiomh Solais which is created by performing an Electric Chair Execution on Mother Harlot. His strongest ranged weapon is Utopia and can be bought from Untouchable on 12/22. It has the chance to inflict Forget on an enemy when used, and is the only weapon in the game with 100 accuracy. However, damage-wise, Dreamstone II has the highest attack power out of any of his weapons, although it doesn't have the remaining benefits the Utopia has. The weapon can be received by customizing a regular Dreamstone at Untouchable.
Morgana's strongest armor is the Nekomata Coat+, which, although evasive already, also lets him evade Psy attacks, which can be handy for emergencies when he gets afflicted with mental ailments, all of which block his movement, as well as prevent him from being exploited with Technical damage.
| Pool | Explanation | |
|---|---|---|
| Average, conservation-based combatant with emphasis on overwhelming his enemy via evasion and luck; heals party only in emergencies. | ||
| Model | Explanation | |
|---|---|---|
| Precision (Offense) |
Complement (Modifier) |
Persona 5 introduces a 5-3 (skill-passive) composition system, simplifying the usage of the combatants while balancing between diversity and simplicity (so there's no unnecessary overwhelming with choice.) The rules are as follows: * The first 2 skills are always offensive. * The second pair of skills can be anything. * The fifth skill is a Support-based modifier. * The power tiers between the first 4 skills can be organized differently. The modifier skills are always balanced between themselves. * The final 3 skills are always passive. |
| Flexibility (Offense) |
Efficiency (Passive) | |
| Situational (Variety) |
Emphasis (Passive) | |
| Emergency (Variety) |
Insurance (Passive) | |
| Conservation | ||
| Alternative | ||
| Protection | ||
| Variety | ||
Persona 5 Royal[]
In Persona 5 Royal, Morgana can learn Pulinpa on Level 19, a skill with a high chance of Confusing a foe. His high Luck makes it much more likely to inflict, and can generally be used for grinding items and money. If the protagonist reads "Knowing the Heart," Morgana will also be able to use his Wind skills in succession to perform Technical damage on the afflicted foe, preferably right after the enemy has used up their 1st turn due to the ailment's shortened recovery time as well as its instant-remove status upon being hit with an attack.
Morgana can initiate Showtime with Ann Takamaki and Haru Okumura. His Showtime with Ann can be unlocked as early as June 21st, and Haru's on September 20th.
Morgana's special Persona Trait is Proud Presence, which helps increase the effect of the party's healing skills when he's on the field. Morgana's own ability doesn't add a guaranteed use in combat, but gives room for planning and switching out the responsibilities of healing onto someone else. Per the logistics of healing, which can be interpreted as a core responsibility that might be pushed upon a specific party member, Morgana's trait encourages turning it into a flexible duty that allows all party members to perform their primary roles in combat, while also opening up more possibilities on how to plan each individual ally's priorities on healing. Otherwise, solely from Morgana's perspective as an emergency healer, the Trait helps save turns for larger turnarounds in terms of healing, compared to having to extensively heal to catch up.
From a strategic standpoint, Proud Presence gives Morgana flexibility as well, allowing him to rely only on emergency healing by passing the responsibility of standard healing onto other allies. Otherwise, it is possible to give away Morgana's role as a healer entirely by omitting from related healing skills. Otherwise, within mid-game his ability may encourage extensive use of Mediarama over Mediarahan.
One gameplay change from Persona 5 is that both Lucky Punch and Miracle Punch's Critical output has been tweaked: not only has the Critical rate of both been reduced, but the rate is even for both skills, meaning they only differ in damage and cost.

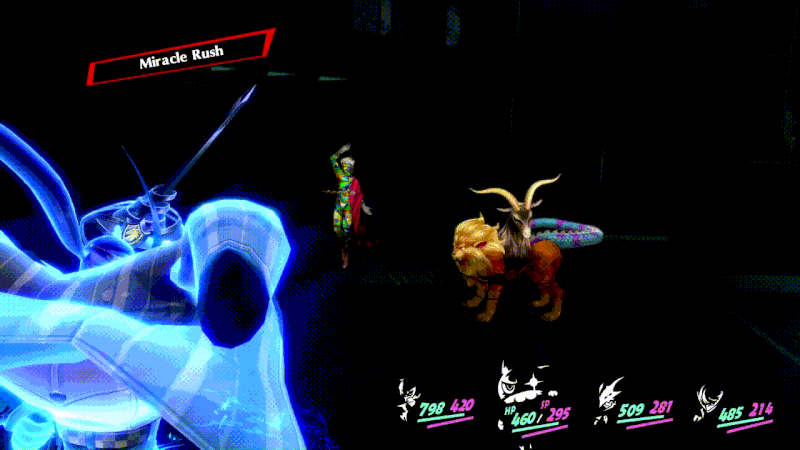
Morgana casting Miracle Rush.
Morgana's Persona will automatically transform into Diego on the evening of January 10th, a few days before the full group is able to properly infiltrate Maruki's Palace and the Path of Da'at. Diego will make it possible for Morgana to learn Miracle Rush, a variation of Miracle Punch, which now targets all enemies, but has reduced accuracy and Critical rate. Like with other party members, this skill can only be used during the very end of the game.
Unlike other third awakening skills, Morgana's skill can be used constantly and at any time, not only due to its low cost but also due to its nature as a Physical skill, meaning Morgana can use Miracle Rush at any time whenever appropriate, instead of having to wait for the right moment.
Miracle Rush can be especially useful due to its property to grant One Mores, which lets Morgana try again and Down even more enemies should he be barely unlucky with his yield, as long as at least 1 enemy is downed, which becomes more unlikely the more standing enemies there are on the field. That being said, because of Miracle Rush's unpredictable nature, it is less likely to initiate Hold Ups even against a single enemy. Otherwise, there's more potential for Morgana to combo enemies with Garudyne via Criticals, One Mores and Down damage modifiers, though when using Miracle Rush, the logistics of the strategy is to have Morgana single out a target by random. Otherwise, as an independent combatant, Morgana can combo Miracle Rush with his Wind skills to greatly amplify his damage dealt in 1 turn.
In addition, his Persona Trait will upgrade to Majestic Presence, which can also save SP when healing skills are used.
Morgana's melee weapons have been fleshed out in terms of property: though at first they cater to afflicting ailments, most of them happen to support Morgana's own playstyle in terms of Technical exploitation (especially the Hot-Blooded Sword and the Panic Sword, which afflict Burn and Confuse,) before giving way to Persona-enhancing capabilities like Magic and SP boosts.
On customization in Untouchable, Morgana is the only early-game party member to be able to have his ranged weapons customized to all 3 elemental ailment camos (Burn, Freeze and Shock), at the trade-off of reducing the gun's attack power and halve its round cap per battle (from 5 to 3 for Morgana). This may only grant additional chemistry with Strength-based or Nuclear-efficient combatants through Technicals, but Morgana may also exploit the Fire Camo [F] to deal Technical damage on his own. Other party members that gain access to all camos at once are Goro Akechi and Sumire Yoshizawa.
The Fire camo is also the most common elemental ailment camo in general, which grants Morgana many opportunities for Technical chemistry with other party members.
Morgana's overall armor type has been re-balanced compared to his gendered counterparts: now his equipment has the weakest defense with the highest evasion, where compared to before, it was only comparable to male armor, where female armor was weaker than Morgana's cat armor in terms of both defense and evasion.
One essential armor for Morgana is the Scarf of Mercy given away before fighting Yaldabaoth at the Qliphoth World, giving Morgana the Regenerate 2 effect. It acts as a middle point between his early and middle game as well as the bonus third semester events, as by that time the effects of his trait Proud Presence have become obsolete. Strategically, this allows Morgana to maintain an offensive stance while minimizing the need for emergency healing as much as possible. One additional trait which is prominent for Yaldabaoth's fight is also the fact that this encourages the rest of the party to focus on direct assault as Morgana's Wind attacks already substitute for them.
Morgana's strongest melee weapon remains Claiomh Solais which still requires Mother Harlot to create, but if it is created during a fusion alarm, it becomes its strongest variation, Claiomh Solais R. Both weapons increase Morgana's SP by 50, giving him more room for support.
Sudarshana is instead his strongest ranged weapon in Persona 5 Royal, requiring an Electric Chair execution on Vishnu and becomes Sudarshana EX during a fusion alarm. Both slingshots have a chance to afflict the enemy with Dizzy, which allows any party members to afflict Technical damage on the target and exploit One More and Baton Passes, while also making it harder for them to land a hit on the party in return.
Morgana's strongest armor is Dragon Scale Scarf, obtained from collecting Sooty Scale Armor from Fafnir through negotiation or drops and putting it for laundry. Not only is the evasion very high, the armor greatly reduces damage from Physical skills, making him a powerhouse against Physical-oriented enemies, especially as Morgana's already evasive and is less prone to taking Critical hits (although the armor doesn't affect Gun attacks.)
| Pool | Explanation | |
|---|---|---|
| Average, conservation-based combatant with emphasis on overwhelming his enemy via evasion and luck; heals party only in emergencies. | ||
| Model | Explanation | |
|---|---|---|
| Precision (Offense) |
Complement (Modifier) |
Persona 5 introduces a 5-3 (skill-passive) composition system, simplifying the usage of the combatants while balancing between diversity and simplicity to ensure that one isn't overwhelmed with nor deprived of choices. The rules are as follows: * The first 2 skills are always offensive. * The second pair of skills can be anything. * The fifth skill is a Support-based modifier. * The power tiers between the first 4 skills can be organized differently. The modifier skills are always balanced between themselves. * The final 3 skills are always passive. |
| Flexibility (Offense) |
Efficiency (Passive) | |
| Situational (Variety) |
Emphasis (Passive) | |
| Emergency (Variety) |
Insurance (Passive) | |
| Conservation | ||
| Alternative | ||
| Protection | ||
| Variety | ||
Persona 5 Strikers[]
Morgana's stat distribution in Persona 5 Strikers is very similar to that of Persona 5, with the exception of several minor stat raises. Hence, he plays very similarly in Strikers as well.
Morgana's battle style has him focused more as a healer with a side of offensive magic damage. Additionally, he may be able to cast Miracle Punch via Combo Attacks or Master Arts. Doing so will not cost any HP to use.
Morgana's ability to inflict Technicals is emphasized, as he can learn the skill Technical Adept, which increases damage inflicted by technical hits. This in particular can be made use of if he teams up with Ann Takamaki or the protagonist, who both have the potential to inflict their enemies with Burn.
Additionally, he is able to learn Dormin Rush, a Physical skill which has a chance of inflicting any enemy within a wide range with Sleep, essentially making them vulnerable to a Technical hit from any direction. This becomes more handy as Sleep is no longer cured when the user is attacked.
Furthermore, Dormin Rush's ability to inflict Critical hits can also be exploited. It is especially useful when going against a massive horde of normal enemies, as simply 1 Critical hit is enough to unlock an arena-wide All-out Attack.
Dormin Rush on its own also allows Morgana to act against Shocked and Frozen targets as well, granting him decent chemistry with Electric and Ice attackers as well, albeit the attack won't be as strong as Wind skills via Burn, especially when Morgana gets the opportunity to enhance the damage of his Wind attacks.
As Game Overs now occur when the entire party's wiped out, rather than just the protagonist, this expands Morgana's abilities to revive, without the emphasis of having to keep the protagonist in decent shape. This is especially prominent in Morgana's final skill Salvation, as it now revives all fallen allies at once.
On Morgana's non-skill based combo attacks, his simplest attack, ![]()
![]()
![]()
![]()
![]() (C5), lets him generate a wheel of wind that he'll send forward a straight line. Obtaining the Animal Instinct Master Art will allow him to perform a Follow Up.
(C5), lets him generate a wheel of wind that he'll send forward a straight line. Obtaining the Animal Instinct Master Art will allow him to perform a Follow Up.
On combo attacks with more elaborate mechanics, ![]()
![]() (C2) lets him perform a Wind-type close-range spin slash while he rises in the air. There's a similar variant,
(C2) lets him perform a Wind-type close-range spin slash while he rises in the air. There's a similar variant, ![]()
![]()
![]()
![]() (C4), which is more wide-range. With the Cat's Paw Master Art, it can pull regular enemies in the air.
(C4), which is more wide-range. With the Cat's Paw Master Art, it can pull regular enemies in the air.
Morgana's unique quirk is to transform into a van, which lets him use his movements to deal minuscule, but continuous damage by driving into enemies. Obtaining the final Cyclone Charge Master Art will let him perform an attack, which lets him ram into them. This attack has a Wind affinity, and causes a shockwave upon collision with the ground. Getting attacked at all makes him revert back to his regular state.
Morgana's regular gun is enhanced to deal 6 homing attacks at enemies, which cannot miss. He has 30 ammo.
Strategies[]
This section compiles various strategies and uses of Morgana in terms of more expansive circumstances.
By Palaces[]
Kamoshida's Palace[]
The first Palace is straightforward, as only a full party needs to be managed without thinking of managing party arrangement.
The party's playstyle is simplified as well, distinguishing the party only via attack types. Morgana in particular has Wind skills, but the only enemy that is weak to it is Agathion, who might also be able to counter Morgana with Zio. Morgana also has Dia on his arsenal, and as well as Patra, which is an effective counter against enemies that try to afflict Sleep.
Unique to Morgana in Kamoshida's Palace, he will very often go first in combat, mainly only being able to be outpaced by Joker depending on the circumstances. Because of this, Morgana can start combat with emergency healing should there be a need for it, especially in enemy ambushes. This can also work if Morgana fainted in a previous battle and he returns in the next with just 1 HP. Protecting the protagonist from losing his HP is key, so Morgana must be made use of in that regard.
Although Morgana has a very restricted role as a healer and would be hindered if his attacks were ineffective, none of the Shadows in Kamoshida's Palace resist Wind.
It is not mandatory to buy powerful melee weapons for Morgana from the get-go, as one locked chest contains a Ryozanpaku Sword for Morgana, which tops all swords that can be bought at that time at Untouchable.
Madarame's Palace[]
Morgana's skill pool expands to multi-target attack and healing skills (Media and Magaru). Magaru will allow for a quick way to deal damage to all enemies, especially if One More (+Down damage modifier) can be made use of. And although Media heals all allies, at that point of the game it will have weak recovery input, roughly around a third to fourth of the party's HP.
Morgana will also gain the ability to use Lucky Punch. The use is luck-dependent, but it is recommended to make use of it regardless, as it can open up back-door strategies which can both conserve the party's HP/SP as well as save the party out of emergency situations. It might be especially useful against Nue, which is a lone, but powerful encounter, as well as in battles with Apsaras, who will prioritize protecting hers or her allies' weaknesses with elemental walls (Fire/Ice/Elec/Wind, which are the party's primary elements thus far.)
If the Zodiac Charm is equipped, Lucky Punch's Critical rate will be increased. The protagonist can also use one of his Personas to enhance him with Rebellion, and Yusuke's Sukukaja can be used to increase his accuracy to ensure he doesn't miss, which in turn reduces his Critical rate. Depending on how early Yusuke's recruited, if his Level is higher, he'll be able to act before Morgana.
In Royal, it is recommended to skip out on buying a melee weapon for Morgana, as there's a locked chest as early as the first exhibition room that yields the Lunar Cutlass, the strongest melee weapon for Morgana in terms of both attack and accuracy. The alternate option is the Sonic Blade for 9,000 yen, which although has reduced attack and accuracy, boosts the user's Agility by 3. It is recommended for use should one seeks to increase Morgana's general accuracy and evasion in battle.
For the most part, Morgana can rely the most on the Mythical Scarf, laundry armor that can be obtained by having Koropokkuru drop Sooty Elder's Armor. It has increased Agility by 3.
Once Madarame's Treasure is secured, itemization becomes available: the strongest Morgana armor that can be received at the time comes from itemizing Jack Frost, who will produce the Frost Hood. Not only does it have increased defense and evasion, it also boosts the user's SP by 20. The primary difference is that it doesn't increase the user's attack accuracy like the previous case.
Kaneshiro's Palace[]
In Royal, the weapons Morgana can equip are the Talwar and the Sleeper Blade, which have a low chance to afflict Confuse and Sleep respectively. The Sleeper Blade has higher attack power and accuracy than the Talwar, and although both ailments wear off instantly upon being hit with an attack, Confuse wears off a turn earlier and Technicals can only be exploited via Psy damage. It is only recommended to rely on Confuse for the sake of grinding items and money.
If relying on the Sleeper Blade, the enemy can either be stalled or have an ally deal Technical damage onto it at the cost of waking it up. Because Sleep heals the enemy, it is highly recommended not to delay the follow-up attack, and that Morgana's melee attacks are against enemies with either barely any chipped health, or aren't listed to go straight after Morgana.
The primary option for armor is the Nekomata Coat (washed via the Sooty Cat's Armor from Nekomata), which although has reduced evasion compared to the Frost Hood, puts an emphasis on evading Psy skills, which is especially useful if he's afflicted with a mental ailment and, as he's unable to act, is also vulnerable to Technical damage.
Once Kaneshiro's treasure route is secured, fusion alarms become available, which allows for itemization for stronger items from Personas. Itemizing Jack Frost during a fusion alarm will produce the Frost Ace Hood, which has matching evasion like its normal variant, and gives +40 SP to the user. Compared to the Nekomata Coat, it has lower defense, so it's recommended to equip it if its positive properties are worth using.
Futaba's Palace[]
In Royal, Futaba's Palace puts a strong emphasis on Morgana, as many of the weapons that can be itemized are catered to him: Itemizing Pisaca drops the Headhunter Ladle and Headhunter Ladle EX swords, which have an increased Critical rate (higher for the EX variant.) Because they have reduced accuracy, it is highly recommended to apply accuracy/evasion buffs in advance.
Additionally, itemizing Neko Shogun yields the Catnap and Cat Buster slingshots, both enhanced with Med Sleep, granting an opening for Technical damage.
Otherwise, for weaker melee weapons with increased accuracy, there are the Blood Scimitar and the Mut Cutlass: the Blood Scimitar has a medium chance of afflicting Despair, and is obtained from completing the request "Calling for Justice for Cats," while the Mut Cutlass is in a locked chest deep within Futaba's Palace (Chamber of Rejection 2F), which slightly reduces Curse damage.
Morgana's strongest armor is the Snakeskin Scarf from washing the Sooty Snakeskin from Naga, which increases his Endurance by 5.
Okumura's Palace[]
In Okumura's Palace, Morgana's role might become prominent as the Palace specializes in afflicting Hunger en masse, implying that Morgana should keep and use Me Patra during the scope of this Palace. It is highly recommended to keep Morgana in the first third and the last thirds of the Palace, as not only is Lilim weak to Wind, Scathach has no weaknesses, hence prompting Morgana to use Miracle Punch, a skill he should've learned during this Palace.
In Royal, the Cosmic Sword and Chief's Cutlass can be bought for Morgana. The Cosmic Sword, the weaker of the two, has the additional chance of afflicting Shock, which is recommended for use if there's necessary chemistry to be found between him, Makoto and Haru.
Additionally, Morgana's strongest armor, the Shocking Scarf (Wash Sooty Feather Coat and obtain from Thunderbird) has the secondary property of reducing damage he takes from Electric skills, his weakness, which acts as crisis control in worst-case scenarios.
Niijima's Palace[]
In Royal, Morgana's strongest weapon are the Heavy Saber from Untouchable. The other option is the Hot-Blooded Sword, which is traded by Trader Sakai in Kichijoji before the Palace starts. Although weaker in both power and accuracy, it has a medium chance to afflict Burn, opening up for Technical damage.
Morgana's strongest armor, the Pure Collar (Wash Sooty Horn and obtain from Unicorn increases his Luck by 6, which is useful against insta-kills, Criticals and ailments, and also increase his odds of landing Miracle Punches. It is recommended to stack with the Hot-Blooded Sword.
Shido's Palace[]
In Royal, the God Saber from Untouchable increases Morgana's Magic stat by 3, making the most out of his Wind attacks and Healing skills.
The Wild Lion Scarf, received from Sooty Lion's Mane and dropped by Barong, is the sturdiest armor for Morgana, and moderately increases his evasion to Physical attacks.
Depths of Mementos[]
In Royal, neither of Morgana's melee weapons have secondary effects, but the Answerer has increased attack power and accuracy compared to its cheaper variant, the Bright Sword.
Morgana's strongest armor is obtained at the very end of the dungeon within the Qliphoth World: the Scarf of Mercy, although has reduced evasion, is enhanced with the Regenerate 2 passive, which slowly recovers his HP every turn.
Maruki's Palace[]
Aside from Morgana's strongest equipment, during the beginning of the Palace, Morgana can either equip the Megistos Sword or the Vertical Edge. The Vertical Edge has higher attack and accuracy, but the Megistos Sword has the additional property of increasing his Magic by 5, so it is recommended to account for how often melee attacks are used compared to Wind and Healing skills, as well as how important they are for his set-up and whether either needs any additional maintenance.
With Party Members[]
Morgana & Ryuji[]
If Ryuji rarely spends his SP and/or is not in a position to deal damage, he may use Tarukaja on Morgana to have him deal damage with his Wind skills, considering they're cheaper than other magic skills, letting him conserve SP in the process.
Morgana may also use Masukunda to boost the accuracy of Ryuji's Physical skills (as well as melee attacks.)
If Ryuji uses Charge, Morgana may help him increase his damage easily with Lucky Punch, furthering his multiplier with Baton Pass and likely Down. This strategy is particularly useful, as merging multipliers at once will deplete more HP in the long run, instead of depleting them separately. Furthermore, if Morgana cleans the risk of missing with Masukunda, this will very likely ensure Ryuji's attack is a clean hit.
Should there be burned targets, whether from the protagonist or Ann, Ryuji may help Morgana with Tarukaja in succession to help him do the most out of the condition before it wears off.
In Persona 5 Royal, during early stages of the game, at least before the Technical rank is maximized, if Ryuji Shocks an enemy, Morgana can use his Lucky Punch skills to stack his odds of Downing the enemy, whether it's through a Critical hit or from the dice roll from landing a Technical attack. The only other set-back is the low accuracy.
Additionally, if Ryuji grants access to his electric chair execution ranged weapons, all of which can afflict Burn, he can tag with Morgana to afflict Technical damage with his Wind skills. The only downside is that there will not be enough time for Ryuji to enhance Morgana with Tarukaja. It is also recommended to have Morgana go after Ryuji.
Morgana & Ann[]
| See also: Party/Ann Takamaki#Ann & Morgana |
Morgana and Ann may naturally work together with their Technical combination: as Ann deals Fire damage, her enemies may be inflicted with Burn, in which case Morgana's Wind attacks will receive a damage boost on the afflicted targets: although Morgana has the 2nd highest magic stat behind Ann, his attacks may surpass hers if they're under the status of Technical.
Ann's Tarunda also supports Morgana in terms of sustainability, and also boosts the value of his healing abilities as well, as their HP is that much more difficult to deplete. This also supports his reviving abilities, as it reduces the risk of recovered allies to faint immediately after.
In the scenario that Morgana's busy, Ann can use her own healing skills on him as backup, even if they're only single-target.
If Ann uses Concentrate, Morgana may use his Lucky Punch set of skills to accumulate damage quickly via the multipliers of Baton Pass chains and the Down condition. Morgana's Masukunda can also minimize the risk of wasting the attack and the chain since it missed.
In Persona 5, Ann can stall for Morgana with Tentarafoo, giving him time to use Lucky Punch on any enemy.
In Persona 5 Royal, as Technical hits are able to Down enemies (although the Technical Rank needs to be maximized for them to guarantee a Down), Ann's ailments can be used efficiently with Morgana: the Wind/Burn combination can now allow Morgana to make use of 1 More, or even pass the baton to another user.
Under these rules, Ann's Dormina can help extend any Baton Pass streaks for the party, as any attack will inflict the Sleeping target with Technical, although it wears off immediately after being hit. This artificial streak can be further extended with a Lucky Punch: where the first recipient of the Baton Pass will either have to target a single enemy's weakness and avoid the Sleeping target for the third recipient, or target all enemies regardless and ensure the second recipient has a target left to Down via weaknesses. That way, Morgana and Ann both artificially extend the party's Baton Pass streak by 2, with only 1 recipient left to act and exploit weaknesses. The protagonist may be used as the 2nd recipient to exploit the weakness of any standing enemy, unless the other available party member is able to Down another enemy on their own.
However, Ann herself may be the final recipient of Baton Pass, and if she were to use Concentrate before she gets called in the streak, she could be able to inflict massive damage: if her Baton Pass Rank is maximized, the damage she inflicts will be over 6 times the normal attack would inflict. As the damage on Downed enemies is increased, the damage will be near 9 times the usual: depending on the circumstances, All-out Attack may be skipped if Ann's attack is enough to shred enemies.
Another strategy Morgana and Ann can make use of is to use skill accessories to swap affinities. This particular combination works especially, as Morgana has the highest Luck stat (even if it's slightly higher than Ann's), making it much easier for him to Burn enemies, whereas Ann has the highest magic stat in the game, which can be useful when she deals Technical damage with it. Ann can swap to Nuclear attacks and Morgana can use Shock in succession, although Wind skills conserve SP.
Morgana & Yusuke[]
| See also: Party/Yusuke Kitagawa#Yusuke & Morgana |
Yusuke's Sukukaja may support Morgana's Lucky Punch: although the skills' Critical rate are already low, the same applies for their accuracy: by increasing his accuracy, Morgana will have higher odds of landing Lucky Punch successfully, even if the overall increase is small on its own.
Regardless, if Morgana were to strike successfully and Down the enemy, he may pass his extra turn to Yusuke, letting some of his skills deal extra damage via Baton Pass.
Additionally, Morgana's Masukunda and Yusuke's Sukukaja may greatly increase their evasiveness against enemies. This is particularly useful for low-accuracy moves.
Morgana & Makoto[]
Makoto can grant Morgana increased Defense to cover for his vulnerability. Additionally, Makoto may be able to protect Morgana against debuffs, especially Rakunda, with the use of Dekunda.
As both are efficient in healing, they can often juggle between healing and offensive depending on the situation, without the risk of leaving the party exposed without any healing. If Morgana's role as a healer only emphasizes on his stronger skills, Makoto in exchange can be used for more precise healing: for example, if Morgana were to sport only Samarecarm and Salvation, Makoto could instead use healing skills that are cheaper and more specific, particularly Diarahan and Mediarahan.
Additionally, as both are efficient in exploiting Technical damage, particularly Burn, they may be paired up with a Fire user, particularly the protagonist and/or Ann, to deal increased damage to burned enemies.
In Persona 5 Royal, Morgana's trait "Proud Presence" can increase the effect of Makoto's healing skills. Although that doesn't do anything with Diarahan and Mediarahan, Makoto can use this opportunity to preserve at least Mediarama to conserve x2.5 the SP. Morgana's upgraded "Majestic Presence" also has a chance to conserve SP, which although works on Mediarahan, can be especially useful if it cuts Mediarama's SP cost.
Morgana & Haru[]
| See also: Party/Haru Okumura#Haru & Morgana |
Haru may be able to protect Morgana with her Tetrakarn and Makarakarn skills, in relation to his low defenses and if his weakness is struck.
Should Haru inflict an enemy with Rage, as their evasion is decreased, it'll make it much easier for Morgana to land a critical hit with Lucky Punch, most likely without the need of Masukunda, and will help increase the value of the party's Baton Pass, as they're tackling an enemy with decreased defenses.
Their abilities emphasize on the party's ability to exploit streaks, as although Morgana acts as a trigger (Lucky Punch) and can guarantee the streak sticks (Masukunda), Haru neutralizes beneficial effects to the enemy (Downs & 1 Mores) and nullifies anything preventing special conditions (All-out Attacks and Baton Passes) by healing status ailments. In short, Morgana and Haru teaming up ensures the party has the upper hand in accessing streaks.
Haru may also be able to use her shield skills to help pave way for Morgana's healing and help him stall, particularly on targets with much more depleted HP than the rest. If used strategically, it may allow Morgana to increase the value of his upcoming healing and conserve SP, without the risk of overdoing it and having the ally die instead.
In Persona 5 Royal, Morgana may use Pulinpa to Confuse an enemy: if "Knowing the Heart" has been read, both Morgana and Haru may single out that enemy with their Gun or Wind skills. Otherwise, Morgana may keep it up with Confusing foes and let Haru deal damage. On another hand, Haru may use Tentarafoo instead, and have Morgana take the offense with multi-target Wind skills instead.
Morgana & Akechi[]
Morgana and Akechi directly contrast one-another in their playstyles, as Akechi focuses on direct offense with nearly no ally support.
Although only available rarely, Akechi can support Morgana by reviving him should he faint in battle. The same can go the other way.
In Persona 5 Royal, Akechi's ultimate weapons, Hinokagutsuchi and Hinokagutsuchi II, can afflict Burn, giving Morgana room to afflict Technical damage. This can be handy if Akechi's cornered and cannot deal Physical skills, forcing him to rely on melee damage.
Morgana & Yoshizawa[]
Yoshizawa may support Morgana via Brave Step, a signature ability that boosts the party's Critical rate for 3 turns, helping his ability to use Miracle Rush, making Criticals more common.
Morgana & the protagonist[]
| See also: Party/Ren Amamiya#With Morgana |
This section covers strategies that cannot be utilized by any other party member.
Although the protagonist cannot be revived, he is usually the only other party member that may revive Morgana if he were to faint; this supports him in utilizing his own recovery abilities in return. Both can be set up in the party so to balance the time needed to revive: if Morgana is placed third in order, there will be a balanced period of time between the two party members to act, as well as to react to the enemies' attacks accordingly.
The protagonist may also join Morgana in utilizing the Lucky Punch set of skills, helping one cover for the other if it were necessary to set up a combo of multiple Criticals in a row.
The protagonist is also able to use Rebellion on Morgana to increase his Critical rate. This also applies to Revolution which increases the Critical rate of all allies, as although it's a riskier approach since it also boosts that of enemies, the difference is nearly insignificant if the party manages to pull off a fatal streak before the enemy can act.
Because of Morgana's high agility, as he can very easily go right after the protagonist, Morgana's Lucky Punch skills can help pass the baton to the protagonist. Morgana's Lucky Punch skills are normally useful for conserving SP (as the Lucky Punch skills cost HP and don't actively require healing.) One unique Technique involving Lucky Punch and the protagonist would be to use it to speed up the process of afflicting enemies with Fear before finishing them off with Ghastly Wail, a process which would otherwise take two turns to wrap up. Especially in Royal, as Baton Passes can restore SP when ranked up, Morgana's quick and easy access to Baton Passes may be beneficial.
Especially in Royal, because of Morgana's trait which increases the healing abilities of his allies, as well as potentially reduce their SP cost, having the protagonist heal in his place can be beneficial, as it encourages him to conserve SP and use low-ranked healing skills (such as Mediarama instead of Mediarahan), and gives Morgana more freedom of movement. More importantly, if the protagonist has a consistent set-up as a healer over the course of the game, this can allow Morgana further versatility to his core moveset by letting him minimize or even remove healing skills off his arsenal, adding room for moves from his leveling up pool, especially with offensive skills, as well as additional support skills from Jazz Jin. The primary downside is that the protagonist's own freedom of movement is going to be restricted, especially since he himself has the most general versatility as a Wild Card.
Morgana, Ryuji & Ann[]
With Ann's ability to afflict Burn and Ryuji's use of Tarukaja and his ability to access Baton Passes with Critical hits, the two can make room for Morgana to exploit the enemy's Technical weakness to Burn more than 3 times before they recover from their ailment. Because of this, Morgana will have increased attack power due to multipliers caused by Technical and Tarukaja, and the effects will stack whenever he's in a Baton Pass, and even further on enemies that are Downed.
Morgana, Ryuji & Haru[]
The trio has an emphasis on Critical hits, due to Ryuji and Haru's Physical set up and having moderate Luck. That way, they can easily access Baton Passes even if they can't exploit weaknesses.
That makes Ryuji's Tarukaja much more prominent, as Baton Pass lets the party act multiple times before their 3 turns are up.
In Persona 5 Royal, the three can also make use of Technical damage to Down enemies, as Ryuji's Forget can be exploited by Psy and Shock, and Morgana and Haru's Confuse with Psy, Gun and Wind. Haru can also exploit Ryuji's ability to Shock enemies as well.
Morgana, Ann & Makoto[]
The trio excels in several areas:
- As Ann can quickly set enemies on Fire, Morgana and Makoto can both make use of that to afflict Technical damage. Morgana can use Masukunda to help cover for any accuracy gaffes, especially with Ann.
- Ann and Makoto can both maximize the party's defenses with both Tarunda and Rakukaja, covering up Morgana and Ann's fragile nature.
- The two can also exploit Dekaja and Dekunda to ensure the enemy doesn't get the upper hand with their buff skills.
- Morgana can help cover for Makoto's low Luck via his respective evasivess and revival skills, especially as getting knocked down or afflicted with an ailment can leave her to faint, and instant-kill attacks are difficult for her to avoid.
- They are all efficient healers, allowing to juggle the responsibility easily, although Ann can only heal 1 person.
In Persona 5 Royal, these three party members can make use of their Persona traits to increase their performance: Morgana's increases the effect of the party's healing skills, Ann may decrease their magic cost, and Makoto can make it that much easier for Ann to Burn enemies.
Morgana, Ann & Haru[]
The unique thing about Haru is that in late game, she can learn Heat Riser, a buff that combines Tarukaja, Rakukaja and Sukukaja. This specific set-up consists of the party that doesn't have these skills in their arsenal otherwise, giving them room to a versatile amount of support. The only trade-off is that the buff can be given to 1 party member only. Morgana and Ann can still use Masukunda and Matarunda to enhance the party's accuracy and defense. Haru can cure ailments and rely on shields to protect against weaknesses, while Ann can also use Dekaja to prevent the enemy from buffing themselves. Only Makoto's Dekunda is unavailable for this set-up.
Haru works similarly to Ryuji in the set-up with him, Morgana and Ann, as she can hunt down Critical hits with her Gun attacks and support Baton Passes. Should Ann Burn the enemy, Haru can pass the Baton to Morgana for Technical damage, and if he's buffed with Heat Riser, those three multipliers can increase his damage output. Additionally, the increased accuracy prevents the Baton from being cancelled out, and his defense makes it more difficult for him to be taken down while Heat Riser is in effect.
In Persona 5 Royal, this formation unlocks both of Morgana's Showtimes.
The trio can especially make use of the other trio's abilities by integrating skill accessories with Bufu, Zio and Frei, establishing more flexibility with exploiting weaknesses and extending Baton Passes.
- Should the party's weaknesses be put into consideration (against repelling enemies), Ann can be given Frei for Technical exploitation, while Morgana gets Bufu and Haru Zio.
- To maximize opportunities for Technical exploitation instead, as Freeze thaws on contact, Morgana can be given Frei while Ann uses Zio, as although both the Technical output and affliction rate will be both mildly reduced, there will be more opportunities to exploit Technical damage.
- Otherwise, should there be awareness of the risks and which enemies are deadly, giving Morgana Zio and Ann Frei will ensure the affliction rate, the damage output and the number of opportunities to exploit Technicals are all maximized.
The opposing party: Ryuji, Yusuke and Makoto can be given skill accessories on their part as well, allowing for seamless switching between the two groups for conserving SP, although the accessories will have to be double-checked every time in case a different arrangement is established.
Morgana, Akechi and Yoshizawa[]
Grouping Morgana with Akechi and Yoshizawa allows for the most freedom in setting up gun customization, as all three of these party members have no restrictions to what ailments their guns can be set up to afflict, which are either Burn, Freeze or Shock. One way to arrange them is to emphasize between both Burn and Shock, guaranteeing Technical damage from both Akechi and Yoshizawa's Physical and Morgana's Wind skills. Furthermore, the protagonist may chime in as his Jig 227 can be customized to Burn only, which further adds to the party's ailment efficacy.
For example, with consideration of the teammates' general turn order, Sumire may have her gun enhanced to afflict Burn, and then Morgana can deal Shock for Akechi. Akechi may then rely on Shock again for Sumire.
This strategy also accounts for the protagonist's turn order and his use. Because the protagonist is only able to support Morgana and the only other party member that can exploit Burn is the protagonist, the strategy would insist that both the protagonist goes before Morgana and that the party member before him, Sumire, also supports him with Burn. Otherwise, Morgana and Akechi can continuously support the next with Shock.
This chain, although normally supports the party member right after, goes on the premise that the next party member will instantly react to the respective Technical damage and the next user will have to start all over. Although oscillating between Shock and Burn forces one side in the position of supporting the other, doubling the use of Burn and Shock before switching to the other ailment, as long as the next party member can exploit what came before, ensures that all party members are able to jump between support ensuring that they're actively able to shift between support and offense.
For example, if Sumire Burned an enemy, the protagonist would react to it with Wind or Nuclear skills, and would pass the Baton to Morgana. After Morgana's turn, he would return back to Shocking the enemy. If he failed, Akechi would do the same, and succeeding would grant Sumire the opportunity to exploit Technical before passing her additional turn to Akechi. At one point this can go further in and extend the chain by passing back to the protagonist and Morgana and have them continue exploiting Burn.
In the case that, for example, both Morgana and Akechi failed to afflict Shock midway, Sumire and Morgana would be forced to keep passing down the chain to the next user.
Morgana is unique to the set-up as only he can exploit Burn and pass down Shock, and because of his agility stat and hence turn order, there is very little opportunity to swap out party members. The only normally viable way is to replace Akechi with Ryuji and Haru, as they can exploit Shock, have their guns customized to afflict Shock, and have their turn follow after Morgana.
With Equipment[]
The Venture Saber is a gimmicky weapon that barely deals damage, but has a high Critical rate. The weapon puts priority on exploiting Critical hits and Downing enemies, rather than dealing damage. This can be an useful alternative to the Lucky Punch skills, as melee attacks don't cost any HP.
Auto- skills can be equipped on
- The Skanda Belt can be bought and used on Morgana to enhance the Critical rate of his Lucky Punch skills.
- Although Auto-Sukukaja is an effective defensive maneuver for Morgana, it is recommended to use the Vajra Belt for Defense as an alternative should one not exploit Lucky Punch as often.
- The Rakshasa Belt, an offensive alternative, is highly recommended to use if one uses Morgana specifically for damage. This is especially useful if one has already applied Wind Boost and Wind Amp to his moveset, as his learn pool is not as demanding of many skill slots to make the most out of his role.
With Skill Accessories (P5R)[]
Customization[]
Morgana's generally a perfect fit for inducing ailments due to his Luck. Particularly, he can rely on mental ailments, such as Fear or Brainwash to team up with Haru to deal Technical damage. In the scenario of Fear, if the Spirit Camera (Ghastly Wail) has been bought, that can be equipped by another party member instead to instantly kill any enemy under Fear. Additionally, Dark Spirit Mirror (Stagnant Air) can also be bought, which increases everyone's susceptibility to ailments.
Because of his high Luck, Morgana can also give his hand at instant-death skills, especially as they're almost never used by the party (aside from Akechi in Niijima's Palace). He can try Bless-type Hamaon and Mahamaon, as in during the Depths of Mementos and Maruki's Palace, he gains resistance against Bless, should the effects be repelled back at him.
Morgana can also make use of Sword Dance or One-shot Kill with the Sword Dance Belt and the Special Shot Belt respectively, as although he has a reduced Strength stat, he can still make use of it by exploiting its enhanced Critical rate.
Only available as DLC, Morgana can also go for Black Moon and Black Moon R, which grant him Apt Pupil and increases his Strength stat by 5 and 8 respectively. This can only be used on his Lucky Punch skills and potentially his melee attacks should they have a set up.
Vajra Belt can be made use of to cast the passive skill Defense Master, which gives him automatic Rakukaja for the first 3 turns of battle, letting him cover for his fragile properties and give him time to find an opening on the enemy.
Morgana could use an accessory with one of his pre-existing skills to give himself room for another skill from his pool, with the help of the confessional. The skills he cannot equip are Patra, Me Patra, Garudyne, Wind Break, Masukunda and Miracle Rush (as well as Lucky Punch and Miracle Punch as they can only be obtained randomly via accident during a fusion alarm,) so he could move any other skill out of his primary pool and use it as an accessory.
During late game in Maruki's Palace, Morgana can equip Angelic Grace (via Angel Badge, Crystal Skull or Crystal Skull R) to double his evasion against Magic attacks, which can be used in succession with his strongest armor, the Dragon Scale Scarf, which greatly reduces Physical damage. The Crystal Skulls also increase all of the wearer's stats, the original of which goes by 5, while R is by 6.
As Morgana doesn't learn any Severe skills, he can cover for it by equipping the Storm Sculpture, which lets him cast Panta Rhei, although that only targets 1 enemy.
Because of his efficiency with ailments, he can also try using Fire, Ice and Electric skills for himself for the purpose of their secondary effects, which opens Technical chemistry with other party members. Electricity in particular is a risky choice, as enemies that repel Electricity will instantly have him knocked down. Ice's Freeze effect only lasts until the enemy's hit, but it can be useful for stunning enemies (especially mid-battle, as the Sleep variant heals over time) or piercing through Physical and Gun resistances. Fire in particular lets Morgana open up an opportunity to deal Technical damage on his own.
Learning Skills Early[]
Skill accessories can also be used as substitutes to learning several skills earlier than they're learned. This has several disadvantages, such as how it limits the range of skills that can be used, especially since accessories don't overwrite old skills that might be obsolete, but applying appropriate strategies, such as substituting them with other learnable skills in advance, can help cover for any restrictions.
| Skill | Lv. | Accessory | New Criteria | Acquisition Period |
|---|---|---|---|---|
| Diarama | 24 | Crystal of Lust | Obtain all 3 Will Seeds in Kamoshida's Palace | ~Lv.11 |
| Wind Boost | 43 | Green Band | Shibuya Underground Mall - Tsurukame Diamond | ¥12,800 |
| Samarecarm | 45 | Rejuvenate Charm | Itemize Hariti (fusion alarm) | Lv.40 |
| Wind Amp | 69 | Jade Wind Necklace | Kichijoji - Stoneon | ¥40,000 |
| Featherman Badge | Trade Feather Card in Retro Game Shop Super Baron | - | ||
| Salvation | 75 | Salvation Crown | Tanaka's Shady Commodities | ¥990,000 |
Via Jazz Jin (P5R)[]
As an emergency healer, Morgana's best fit to use condensed, concentrated support skills over timer-based buffs, as it accommodates for not only instantaneous initiation, but also freedom of timing, which are a necessity for emergencies which are simply beyond Morgana's control. From that perspective, Concentrate is a perfect fit for Morgana.
Morgana can learn Concentrate on September 25 to boost his Wind attacks; it can be used as a follow-up to Miracle Punch and even Miracle Rush, and on his next turn he may use either Miracle skill to follow up with a Magic attack, boosted slightly more by the Down multiplier of the respective enemies. This skill might be especially useful if he's exploiting Technical damage. He can use it to prepare during the beginning of the fight before Ann acts. Otherwise, if paired with Ann during the third semester, it is recommended to simply rely on her High Energy skill.
Other single-target buffs include Tetrakarn and Makarakarn, as although they're use over time-reliant, the moment they activate is based on when the enemy attacks, taking away Morgana's volition of activating the skill. Compared to Concentrate, these shields help complement Morgana's role as an emergency healer, allowing him to protect a single combatant in scenarios such as where party-based healing would be wasteful in comparison. That being said, because the SP cost of the shields is higher than even Mediarahan, it is recommended to interpret it as an in-between around single-target revival and party-wide recovery, encouraging healing only when 3 or 4 party members are threatened in combat, and only using shields when 2 party members are on the verge of KO, leaving one of them exposed but still safe under Morgana's Samarecarm when they do faint and can be saved. It is recommended to equip Morgana with shield skills if one wishes to make the most out of Morgana's role as an emergency healer.
Heat Riser and Debilitate are, although timer-based, still concentrated support skills. Though it's likely inefficient for Morgana to use Heat Riser onto himself, it is a good fit to use on an appropriate ally or a specific, but not solitary enemy, unless a boss.
Morgana can learn Masukunda early on August 28, should there be need for it.
Optionally, Morgana could also learn Masukukaja on July 31 and October 23 to use in succession with Masukunda, but that's only if Yusuke isn't active in battle, as Morgana will have to use up every 2 of 3 turns before he can act in any way, and will require Baton Passes from allies if there need be more room for activity from Morgana.
If Morgana is not to use Masukunda, he can rely on Marakunda (August 14, November 13), an attack that makes the enemy team that much more prone to taking damage, and cannot be naturally learned by any party member. It can be used alongside Ryuji's ability to cast Tarukaja to really stack damage.
On January 29, Morgana can learn Spell Master, an attack that halves the cost of his magic attacks, which can be stacked alongside how his Wind skills already conserve SP.
Base Stats[]
Persona 5 / Royal[]
Note: These are the base stats for Level 99.
| |||||||||||||||||||||||||||||||||||||||||||||||||||||||||||||||||||||||||||||||||||||||||||||||||||||||||||||||||||||||||||||||||||||||||
| |||||||||||||||||||||||||||||||||||||||||||||||||||||||||||||||||||||||||||||||||||||||||||||||||||||||||||||||||||||||||||||||||||||||||||||
| |||||||||||||||||||||||||||||||||||||||||||||||||||||||||||||||||||||||||||||||||||||||||||||||||||||||||||||||||||||||||||||||||||||||||||||||
| |||||||||||||||||||||||||||||||||||||||||||||||||||||||||||||||||||||||||||||||||||||||||||||||||||||||||||||||||||||||||||||||||||||||||||||||||||
| |||||||||||||||||||||||||||||||||||||||||||||||||||||||||||||||||||||||||||||||||||||||||||||||||||||||||||||||||||||||||||||||||||||||||||||||||||||||
Persona 5 Strikers[]
Note: These are the base stats for Level 99.
| |||||||||||||||||||||||||||||||||||||||||||||||||||||||||||||||||||||||||||||||||||||||||||||||||||||||||||||||||||||||||||||||||||||||||||||
Combo Attacks[]
| Button input | Effect |
|---|---|
(S5) |
A chain of 5 sword attacks. |
(C1) |
Transform into the Morgana Car. It is also possible to tackle enemies while driving. |
(C2) |
A rising spin slash. |
(C3) |
A punch with high chance of Critical. (Miracle Punch) |
(C4) |
Summon Zorro to use a Wind skill. |
(C5) |
An advancing vertical spin attack. Hold |
Master Arts[]
| Master Art | Button Input and Effect | Abbreviation |
|---|---|---|
| Animal Instinct | Perform a follow-up after |
C5 |
| Cat's Paw | Enemies are pulled in during the spinning portion of |
C2 / C4 |
| Miracle Punch | C3 | |
| Cyclone Charge | While transformed, perform a ram attack that generates a Wind affinity shockwave. | - |
Equipment[]
Persona 5 / Royal[]
Melee Weapons[]
| Weapon | Attack | Accuracy | Effect | Price | Location |
|---|---|---|---|---|---|
| Venture Saber | 10 | 60 | +Critical Rate up (high) | - | Complete "The Money-grubbing Uncle" request |
| Bandit Sword | 38 | 94 | - | ¥2,000 | Default Untouchable |
| Falchion | 48 | 94 | - | ¥2,800 | Untouchable |
| Ryozanpaku Sword | 68 | 94 | - | - | Locked chest - Kamoshida's Palace, Old Castle 3F, East Building Annex Chest - Mementos, Path of Qimranut |
| Sonic Blade | 78 | 94 | - | ¥9,600 | Untouchable, (Madarame's Palace) |
| Scimitar | 86 | 96 | - | ¥11,200 | Untouchable, (Madarame's Palace) |
| Talwar | 98 | 94 | +Confuse (low) | ¥12,200 | Chest - Mementos, Path of Chemdah Untouchable, (Kaneshiro's Palace) |
| Sleeper Blade | 118 | 96 | +Sleep (low) | ¥15,600 | Untouchable, (Kaneshiro's Palace) |
| Shamshir | 126 | 94 | - | ¥16,400 | Untouchable, (Futaba's Palace) |
| Headhunter Ladle | 128 | 90 | +Critical Rate up (low) | - | Electric Chair Execution - Pisaca |
| Resting Sword | 130 | 90 | +Sleep (med) | ¥21,600 | Untouchable, (Futaba's Palace) |
| Blood Scimitar | 140 | 98 | +Despair (med) | Complete the request "Calling for Justice for Cats" | |
| Chief's Cutlass | 150 | 94 | - | ¥22,000 | Untouchable, (Okumura's Palace) |
| Cosmic Sword | 160 | 90 | +Shock (med) | ¥27,200 | Untouchable, (Okumura's Palace) |
| Damascus Sword | 180 | 94 | - | ¥29,400 | Untouchable, (Niijima's Palace) |
| Heavy Saber | 200 | 96 | - | ¥31,200 | Untouchable, (Niijima's Palace) |
| Panic Sword | 224 | 94 | +Confuse (low) | ¥34,400 | Untouchable, (Shido's Palace) |
| God Saber | 242 | 96 | Ma+3 | ¥38,400 | Untouchable, (Shido's Palace) |
| Bright Sword | 248 | 94 | - | ¥40,800 | Untouchable (12/22) |
| Answerer | 276 | 96 | - | ¥45,600 | Untouchable (12/22) |
| Claiomh Solais | 280 | 90 | +50 SP | - | Electric Chair Execution - Mother Harlot |
| Weapon | Attack | Accuracy | Effect | Price | Location |
|---|---|---|---|---|---|
| Venture Saber | 10 | 60 | +Critical Rate up (high) | - | Complete the request, "The Money-Grubbing Uncle" |
| Bandit Sword | 46 | 97 | - | ¥2,300 | Default Untouchable (Kamoshida's Palace) |
| Falchion | 56 | 99 | - | ¥3,900 | Untouchable (Kamoshida's Palace) |
| Sonic Blade | 66 | 97 | Ag+3 | ¥9,000 | Untouchable (Madarame's Palace) |
| Scimitar | 84 | 99 | - | ¥9,900 | Untouchable (Madarame's Palace) |
| Lunar Cutlass | 90 | 99 | - | - | Locked chest - Madarame's Palace: Museum 1F, SP Exhibition |
| Talwar | 96 | 97 | Low Confuse | ¥13,200 | Chest - Mementos, Chemdah Untouchable (Kaneshiro's Palace) |
| Sleeper Blade | 116 | 99 | Low Sleep | ¥16,300 | Untouchable (Kaneshiro's Palace) |
| Resting Sword | 124 | 97 | Med Sleep | ¥18,100 | Untouchable (Futaba's Palace) |
| Shamshir | 134 | 99 | - | ¥20,300 | Untouchable (Futaba's Palace) |
| Blood Scimitar | 140 | 98 | Med Despair | - | Complete the request, "Calling for Justice for Cats" |
| Mut Cutlass | 142 | 98 | +Reduce Curse dmg (low) | - | Locked chest - Futaba's Palace: Chamber of Rejection 2F |
| Cosmic Sword | 148 | 97 | Med Shock | ¥23,600 | Untouchable (Okumura's Palace) |
| Headhunter Ladle | 150 | 90 | +Critical Rate up (low) | - | Electric Chair Execution - Pisaca |
| Headhunter Ladle EX | 150 | 90 | +Critical Rate up (med) | - | Electric Chair Execution - Pisaca (fusion alarm) |
| Chief's Cutlass | 164 | 99 | - | ¥26,200 | Untouchable (Okumura's Palace) |
| Damascus Sword | 178 | 97 | - | ¥27,700 | Untouchable (Niijima's Palace) |
| Hot-Blooded Sword | 190 | 90 | Med Burn | - | Trade two Gear Girimehkala to Trader Sakai in Kichijoji (10/16 - 10/22) |
| Heavy Saber | 198 | 99 | - | ¥32,800 | Untouchable (Niijima's Palace) |
| Panic Sword | 212 | 97 | Low Confuse | ¥37,300 | Untouchable (Shido's Palace) |
| God Saber | 232 | 99 | Ma+3 | ¥43,400 | Untouchable (Shido's Palace) |
| Bright Sword | 246 | 97 | Ma+5 | ¥45,300 | Untouchable (12/22) |
| Answerer | 274 | 99 | - | ¥49,200 | Untouchable (12/22) |
| Megistos Sword | 290 | 97 | Ma+5 | ¥55,600 | Untouchable (1/13) |
| Dark Cutlass | 282 | 99 | - | - | Chest - Depths of Mementos: Prison Passageway |
| Vertical Edge | 310 | 99 | - | ¥60,300 | Untouchable (1/13) |
| Claiomh Solais | 315 | 90 | +50 SP | - | Electric Chair Execution - Mother Harlot |
| Claiomh Solais R | 330 | 90 | +50 SP | - | Electric Chair Execution - Mother Harlot (fusion alarm) |
Ranged Weapons[]
- ↳ (P5) - Ranged weapons marked with this symbol are a customization of unmarked weapon above.
| Weapon | Attack | Accuracy | Rounds | Effect | Price | Location |
|---|---|---|---|---|---|---|
| Slingshot | 62 | 90 | 5 | - | ¥1,200 | Default Untouchable |
| ↳Slingshot SP | 92 | 80 | 4 | +Dizzy (low) | ¥2,800 ¥1,400 |
Customize Slingshot |
| ↳Slingshot HP | 124 | 90 | 4 | - | ¥3,400 ¥1,700 |
Customize Slingshot |
| Slingbow | 74 | 98 | 5 | - | ¥2,600 | Untouchable |
| ↳Slingbow II | 134 | 98 | 3 | - | ¥5,800 ¥2,900 |
Customize Slingbow |
| Shrike | 114 | 94 | 5 | - | ¥8,600 | Untouchable, (Madarame's Palace) |
| ↳Shrike II | 148 | 98 | 5 | - | ¥7,000 ¥3,500 |
Customize Shrike |
| ↳Shrike SP | 144 | 80 | 4 | +Confuse (low) | ¥7,400 ¥3,700 |
Customize Shrike |
| Mount Liang | 122 | 98 | 5 | - | ¥10,600 | Untouchable, (Madarame's Palace) |
| ↳Mt. Liang SP | 250 | 88 | 4 | +Forget (low) | ¥15,000 ¥7,500 |
Customize Mount Liang |
| Upsilon | 128 | 90 | 3 | - | ¥11,600 | Untouchable, (Kaneshiro's Palace) |
| ↳Upsilon II | 184 | 90 | 5 | - | ¥9,800 ¥4,900 |
Customize Upsilon |
| Comet 3 | 142 | 94 | 5 | - | ¥13,400 | Untouchable, (Kaneshiro's Palace) |
| ↳Comet 3 II | 162 | 98 | 5 | - | ¥8,000 ¥4,000 |
Customize Comet 3 |
| Catnap | 168 | 90 | 5 | +Sleep (med) | - | Electric Chair Execution - Neko Shogun |
| Spirit Sling | 172 | 94 | 5 | - | ¥18,200 | Untouchable, (Futaba's Palace) |
| ↳Spirit Sling HP | 254 | 86 | 5 | - | ¥12,400 ¥6,200 |
Customize Spirit Sling |
| Northern Light | 178 | 98 | 5 | - | ¥21,400 | Untouchable, (Futaba's Palace) |
| ↳Northern Light SP | 190 | 84 | 4 | +Freeze (low) | ¥10,200 ¥5,100 |
Customize Spirit Sling |
| Stronger | 194 | 98 | 5 | - | ¥23,200 | Untouchable, (Okumura's Palace) |
| ↳Stronger SP | 214 | 88 | 4 | +Dizzy (low) | ¥12,600 ¥6,300 |
Customize Stronger |
| Shooting Star | 210 | 98 | 5 | - | ¥26,600 | Untouchable, (Okumura's Palace) |
| Intercept | 216 | 90 | 5 | - | ¥27,200 | Untouchable, (Niijima's Palace) |
| ↳Intercept II | 286 | 92 | 5 | - | ¥16,600 ¥8,300 |
Customize Intercept |
| Star Slayer | 246 | 98 | 5 | - | ¥32,000 | Untouchable, (Niijima's Palace) |
| ↳Star Slayer HP | 296 | 90 | 5 | - | ¥16,600 ¥8,300 |
Customize Star Slayer |
| Pirate Killer | 254 | 92 | 5 | - | ¥32,400 | Untouchable, (Shido's Palace) |
| ↳Pirate Killer SP | 322 | 80 | 4 | +Despair (med) | ¥19,000 ¥9,500 |
Customize Pirate Killer |
| Dreamstone | 274 | 96 | 5 | - | ¥32,800 | Untouchable, (Shido's Palace) |
| ↳Dreamstone II | 354 | 96 | 5 | - | ¥19,000 ¥9,500 |
Customize Dreamstone |
| Sling Cannon | 298 | 96 | 5 | - | ¥38,800 | Untouchable (12/22) |
| ↳Sling Cannon II | 316 | 96 | 5 | - | ¥16,800 ¥8,400 |
Customize Sling Cannon |
| Sudarshana | 308 | 98 | 5 | +Random Ailment (low) | - | Electric Chair Execution - Kohryu |
| Utopia | 326 | 100 | 5 | +Forget (med) | ¥42,800 | Untouchable (12/22) |
| ↳Utopia HP | 360 | 90 | 5 | - | - | Customize Utopia |
| Weapon | Attack | Accuracy | Rounds | Effect | Price | Location |
|---|---|---|---|---|---|---|
| Slingshot | 40 | 94 | 5 | - | - | Default |
| Slingbow | 50 | 92 | ¥4,200 | Untouchable, (Kamoshida's Palace) | ||
| Shrike | 86 | 90 | ¥10,400 | Untouchable, (Madarame's Palace) | ||
| Comet 3 | 110 | ¥15,400 | Untouchable, (Kaneshiro's Palace) | |||
| Northern Light | 140 | ¥21,000 | Untouchable, (Futaba's Palace) | |||
| Catnap | 150 | Med Sleep | - | Electric Chair Execution - Neko Shogun | ||
| Cat Buster | 170 | Med Sleep | Electric Chair Execution - Neko Shogun (fusion alarm) | |||
| Shooting Star | 170 | - | ¥27,600 | Untouchable, (Okumura's Palace) | ||
| Star Slayer | 200 | ¥34,600 | Untouchable, (Niijima's Palace) | |||
| Dreamstone | 230 | ¥43,000 | Untouchable, (Shido's Palace) | |||
| Utopia | 270 | ¥52,400 | Untouchable (12/22) | |||
| Falcon | 310 | ¥62,800 | Untouchable, (1/13) | |||
| Sudarshana | 315 | Med Dizzy | - | Electric Chair Execution - Vishnu | ||
| Sudarshana EX | 330 | High Dizzy | Electric Chair Execution - Vishnu (fusion alarm) |
Armor[]
List does not include dirty/sooty armor.
| Name | Defense | Evasion | Effect | For | Price | Location |
|---|---|---|---|---|---|---|
| Neckerchief | 22 | 10 | - | Cats | - | Morgana default |
| Silk Scarf | 24 | 14 | Ma+2 | Cats | ¥2,200 | Untouchable |
| Cat Sweater | 34 | 15 | +Resist Freeze | Cats | ¥4,200 | Untouchable |
| Well-worn Scarf | 42 | 19 | Ma+3 | Cats | - | Wash Grimy Gear |
| Guard Bandana | 49 | 20 | +Resist Freeze | Cats | - | Wash Soiled Armor |
| Breeze Scarf | 57 | 15 | Ag+2 | Cats | ¥8,600 | Chest - Mementos, Path of Aiyatsbus Untouchable, (Madarame's Palace) |
| E-Collar | 67 | 16 | Ma+4 | Cats | ¥11,800 | Untouchable, (Madarame's Palace) |
| Flowing Scarf | 74 | 20 | Ag+3 | Cats | - | Wash Acrylic-coated Gear |
| Camo Collar | 80 | 16 | +Evade Physical (low) | Cats | ¥12,000 | Locked chest - Mementos, Path of Aiyatsbus Untouchable, (Kaneshiro's Palace) |
| Renoir Scarf | 85 | 21 | Ma+5 | Cats | - | Wash Paint-flecked Armor |
| Water Crown | 93 | 17 | +Resist Burn | Cats | ¥16,200 | Untouchable, (Kaneshiro's Palace) |
| Fancy Collar | 99 | 21 | - | Cats | - | Wash Tarnished Gear |
| Id Collar | 105 | 17 | +Resist Brainwash | Cats | ¥17,200 | Chest - Mementos, Path of Kaitul Untouchable, (Futaba's Palace) |
| Flexible Collar | 115 | 22 | Ag+3 | Cats | - | Wash Gold-tainted Armor |
| Sparkly Collar | 118 | 18 | +Evade Curse (low) | Cats | ¥22,200 | Untouchable, (Futaba's Palace) |
| Bandage Collar | 127 | 22 | +Resist Forget | Cats | - | Wash Dust-crusted Gear |
| Frost Hood | 130 | 20 | +20 SP | Cats | - | Electric Chair Execution - Jack Frost |
| Memorial Collar | 132 | 18 | +Resist Forget | Cats | ¥23,000 | Locked chest - Mementos, Path of Kaitul Untouchable, (Okumura's Palace) |
| Magical Scarf | 141 | 24 | Ma+5 | Cats | - | Wash Timeworn Armor |
| Rubber Scarf | 147 | 19 | +Resist Shock | Cats | ¥28,200 | Untouchable, (Okumura's Palace) |
| Measure Collar | 161 | 19 | Lu+5 | Cats | ¥30,800 | Locked chest - Mementos, Path of Akzeriyyuth Chest - Mementos, Path of Adyeshach Untouchable, (Niijima's Palace) |
| Solar Wind Scarf | 163 | 25 | +Resist Shock | Cats | - | Wash Fragmented Armor |
| Quiet Collar | 175 | 24 | - | Cats | - | Wash Spyware-laden Gear |
| Morose Collar | 180 | 20 | +Resist Rage | Cats | ¥32,400 | Untouchable, (Niijima's Palace) Locked chest - Niijima's Palace, House of Darkness |
| Scam Collar | 188 | 25 | Lu+8 | Cats | - | Wash Seedy Gear |
| Killer Collar | 193 | 20 | +Attack Master | Cats | ¥34,000 | Untouchable, (Shido's Palace) |
| Gambler Collar | 210 | 26 | Lu+5 | Cats | - | Wash Smokestained Armor |
| Insomnia Collar | 211 | 21 | +Resist Sleep | Cats | ¥38,800 | Untouchable, (Shido's Palace) |
| Sublime Collar | 224 | 22 | - | Cats | ¥42,400 | Locked chest - Path of Sheriruth, Mementos Untouchable (12/22) |
| Revelry Collar | 224 | 26 | En+5 | Cats | - | Wash Corrupt Gear |
| Gorgeous Collar | 243 | 27 | - | Cats | - | Wash Classified Armor |
| Nekomata Coat | 251 | 23 | +Evade Psy (med) | Cats | ¥47,600 | Untouchable (12/22) |
| Glorious Collar+ | 258 | 28 | - | Cats | - | Wash Desecrated Gear |
| Nekomata Coat+ | 287 | 29 | +Evade Psy (high) | Cats | - | Wash Unholy Armor |
| Name | Defense | Evasion | Effect | For | Price | Location |
|---|---|---|---|---|---|---|
| Neckerchief | 22 | 10 | - | Cats | - | Morgana default |
| Memorial Collar | 24 | 14 | +Resist Forget | Cats | ¥2,200 | Untouchable (Kamoshida's Palace) |
| Cat Sweater | 34 | 15 | - | Cats | ¥4,200 | Untouchable (Kamoshida's Palace) |
| Breeze Scarf | 57 | 15 | +Resist Rage | Cats | ¥8,700 | Untouchable (Madarame's Palace) |
| Old Cat Collar | 59 | 14 | Ma+1 | Cats | - | Wash Sooty Boots |
| Cone Collar | 67 | 16 | - | Cats | ¥9,700 | Untouchable (Madarame's Palace) |
| Cat Knight's Collar | 70 | 14 | Ma+3 | Cats | - | Wash Sooty Boots |
| Rubber Scarf | 80 | 16 | +Resist Shock | Cats | ¥12,800 | Untouchable (Kaneshiro's Palace) |
| Old Mythical Scarf | 86 | 15 | Ag+1 | Cats | - | Wash Sooty Elder's Armor Clothing Grab Bag (Madarame's Palace post-deadline) |
| Hard Scarf | 99 | 17 | - | Cats | ¥14,900 | Untouchable (Kaneshiro's Palace) |
| Mythical Scarf | 102 | 15 | Ag+3 | Cats | - | Wash Sooty Elder's Armor |
| Id Collar | 105 | 17 | +Resist Fear | Cats | ¥17,600 | Untouchable (Futaba's Palace) |
| Old Coat | 109 | 16 | +Evade Psy (med) | Cats | - | Wash Sooty Cat's Armor Clothing Grab Bag (Kaneshiro's Palace) |
| Frost Hood | 110 | 20 | +20 SP | Cats | - | Electric Chair Execution - Jack Frost |
| Frost Ace Hood | 120 | 20 | +40 SP | Cats | - | Electric Chair Execution - Jack Frost (fusion alarm) |
| Sparkly Collar | 127 | 18 | - | Cats | ¥19,900 | Untouchable (Futaba's Palace) |
| Nekomata Coat | 129 | 16 | +Evade Psy (high) | Cats | - | Wash Sooty Cat's Armor |
| Morose Collar | 132 | 18 | +Resist Rage | Cats | ¥23,000 | Untouchable (Okumura's Palace) |
| Old Snakeskin Scarf | 134 | 18 | En+1 | Cats | - | Wash Sooty Snakeskin Clothing Grab Bag (Futaba's Palace) |
| Armada Collar | 157 | 20 | - | Cats | ¥25,700 | Untouchable (Okumura's Palace) |
| Snakeskin Scarf | 158 | 18 | En+5 | Cats | - | Wash Sooty Snakeskin |
| Brave Scarf | 161 | 19 | +Resist Fear | Cats | ¥29,200 | Untouchable (Niijima's Palace) |
| Measure Collar | 188 | 21 | - | Cats | ¥32,200 | Locked Chest - Mementos, Akzeriyyuth Chest - Mementos, Adyeshach Untouchable (Niijima's Palace) |
| Old Shocking Scarf | 161 | 19 | +Reduce Elec dmg (low) | Cats | - | Wash Sooty Feather Coat Clothing Grab Bag (Okumura's Palace) |
| Shocking Scarf | 189 | 19 | +Reduce Elec dmg (med) | Cats | - | Wash Sooty Feather Coat |
| Old Pure Collar | 190 | 20 | Lu+1 | Cats | - | Wash Sooty Horn Clothing Grab Bag (Niijima's Palace) |
| Water Crown | 193 | 20 | +Resist Burn | Cats | ¥36,400 | Untouchable (Kaneshiro's Palace) |
| Old Wild Lion Scarf | 221 | 22 | +Evade Physical (low) | Cats | - | Wash Sooty Lion's Mane Clothing Grab Bag (Shido's Palace) |
| Pure Collar | 224 | 20 | Lu+6 | Cats | - | Wash Sooty Horn |
| Kampff Collar | 224 | 22 | - | Cats | ¥39,800 | Untouchable (Shido's Palace) |
| Lyrical Scarf | 226 | 22 | +Resist Freeze | Cats | ¥44,200 | Untouchable (12/22) |
| Wild Lion Scarf | 259 | 22 | +Evade Physical (med) | Cats | - | Wash Sooty Lion's Mane |
| Sublime Collar | 260 | 24 | - | Cats | ¥48,200 | Untouchable (12/22) |
| Scarf of Mercy | 268 | 23 | Regenerate 2 | Cats | - | Chest - Qliphoth World, Path to the Holy Grail |
| Philosophical Scarf | 268 | 23 | +Resist Brainwash | Cats | ¥54,300 | Untouchable (1/13) |
| Old Infinity Scarf | 291 | 23 | +10 HP | Cats | - | Wash Sooty Gilded Collar |
| Old Scale Scarf | 301 | 23 | +Reduce Physical dmg (low) | Cats | - | Wash Sooty Scale Armor Clothing Grab Bag (Maruki's Palace) |
| Bottomless Scarf | 305 | 23 | +50 HP | Cats | - | Wash Sooty Gilded Collar |
| Pleroma Collar | 307 | 25 | - | Cats | ¥59,100 | Untouchable (1/13) |
| Dragon Scale Scarf | 318 | 23 | +Reduce Physical dmg (high) | Cats | - | Wash Sooty Scale Armor |
Persona 5 Strikers[]
Weapons[]
| Weapon | Attack | Effect | Price (¥) | Location |
|---|---|---|---|---|
| Bandit Sword | 32 | - | Initial | |
| Falchion | 44 | 1,000 | Sophia's Shop | |
| Ryozanpaku Sword | 52 | 1,800 | ||
| Sonic Blade | 72 | 3,200 | Sophia's Shop (8/2) | |
| Scimitar | 80 | 4,200 | ||
| Headhunter Ladle S | 84 | +Critical up (low) | - | Complete request, "Gusts of Punishment" |
| Talwar | 96 | +Dizzy (low) | 9,200 | Sophia's Shop Complete request, "Sophia's Weapon Shop" |
| Sleeper Blade | 114 | +Sleep (low) | 10,800 | |
| Shamshir | 134 | 11,800 | Sophia's Shop (Okinawa) | |
| Resting Sword | 140 | +Sleep (med) | 13,600 | |
| Chief's Cutlass | 148 | En +2 | - | Chest - Kyoto Jail, Path of Harmony |
| Damascus Sword | 182 | 27,000 | Sophia's Shop Complete request, "Sophia's Weapon Shop Redux" | |
| Heavy Saber | 214 | 33,400 | ||
| Bright Sword | 240 | 35,600 | Sophia's Shop (Yokohama, 8/28) | |
| Answerer | 264 | 41,800 | ||
| God Saber | 270 | Ma +2 | - | Lock Lv 3 Chest - Okinawa Jail, Transport Area |
| Cosmic Sword S | 296 | +30 SP | Defeat the Fallen Snowman in Shibuya Jail during the request, "Halt the Strutting Little Imp" | |
| Eckesachs | 330 | Ag +5 / +30 SP | Defeat Dire Shadow in Shibuya Jail on Merciless difficulty (NG+ only) |
Armor[]
| Name | Defense | Price (¥) | Effect |
|---|---|---|---|
| Neckerchief | 25 | - | |
| Silk Scarf | 34 | 1,400 | Ma +3 |
| Cat Sweater | 46 | 2,400 | +Null Freeze |
| Breeze Scarf | 58 | 2,800 | Ag +3 |
| Water Crown | 70 | 4,200 | +Null Burn |
| Cone Collar | 84 | 5,400 | Ma +3 |
| Camo Collar | 100 | 7,800 | +Reduce Phys dmg (low) |
| Sparkly Collar | 116 | 11,400 | +Reduce Curse dmg (low) |
| Morose Collar | 132 | 15,000 | +Null Rage |
| Just Collar | 154 | 24,000 | +Auto-Tarukaja |
| Measuring Collar | 176 | 27,200 | Lu +5 |
| Sublime Collar | 210 | 31,600 | +25 SP |
| Nekomata Coat | 236 | 36,600 | Ag +3 |
| Sublime Collar+ | 266 | 45,400 | +50 SP |
Goro AkechiP5/Royal - Sumire YoshizawaRoyal - SophiaStrikers - Zenkichi HasegawaStrikers | |